Tips For Scanning And Restoring Antique Photographs
Old images may be scanned using smartphone applications or various alternative user-friendly procedures. To learn more, keep reading! Once you’ve decided to scan old photos and restore them, the first step is to gather all of your images. As the last step, you must determine which photos to browse. It is possible to arrange them according to year, event, or even individual. You may create a new digital folder with a name corresponding to that batch for each group of images. When you’ve completed scanning, it’s time to put your files in the correct order for restoring antique photographs.
Beneficial Tips for Scanning and Restoring Antique Photographs
Although smartphone scanners are handy, they do not produce the most excellent quality results. Flatbed scanners and other scanners with greater resolutions may help you achieve better results. Keep reading the benefits of scanning photosand restoring them.
- Disable the auto-correction settings on your computer.
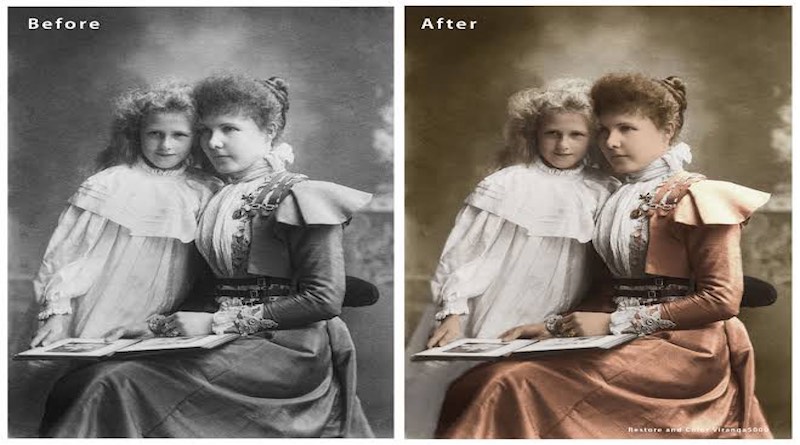
You may use digital picture restoration to restore faded and damaged family photos to their original colour and clarity. Scanning and restoring old images can be much easier if you have the correct equipment.
Here are a few pointers to assist you in getting the scanning antique photograph job done as quickly and efficiently as possible.
- Make sure your camera’s auto-correction features have been deactivated before you begin.
- Ideally, you should choose the highest available resolution. A 1440 x 1080 pixel resolution is good.
- Your photographs may need to be brighter or darker if they’re too tiny. However, by selecting Auto Levels and Equalize, you may enhance the colour of your images.
- Images that have lost their colour may be restored using these settings. If taken on that material, your old Kodak images are likely to have migrated to the blue side.
- It’s possible that the slides used to sell souvenirs turned crimson. Some colour may be lost, but a professional scanner may restore much of it.
- Prioritise the order of photos to be scanned
If you’d want to digitise your family pictures, there are some options. You may either do it yourself or hire a service to do it for you. A scan of your images is necessary no matter how you look at them.
Furthermore, the photos that need scanning and restoration should always take precedence, whether you want to arrange your pictures chronologically or thematically.
Scanning the first set of images will take the longest as you become used to the scanner’s settings. For the first time, scanning antique photographs might take an hour or more. The second batch of scanning only took half the time. Document the scanning procedure so that you may refer to it while scanning the following collection. If this is your first time scanning, take your time and don’t hurry.
- Clean the scanner’s glass
Washing a picture is simple. However, cleaning a photo with substances might cause it to get damaged. While soaking a photograph in distilled water may seem like a good idea, this might do more harm than good. A lint-free cloth is required to wipe the glass of a scanner, unlike a paper towel. The window may be cleaned with isopropyl alcohol diluted if it is dirty or stained. Additionally, using a clean towel to wipe your scanner’s glass plate helps guarantee that there is no moisture underneath it.
It is necessary to clean the scanner’s glass before scanning your images. Digital photographs will not be contaminated by dust as a result of this. Before scanning your picture, you’ll need to clean the glass. This is a must-do if you wish to protect the photo’s surface from damage. Keep in mind that your picture may have been printed on a fragile material, so keep that in mind.
- Adjust the photo’s colour and contrast
Before you begin scanning, change the colour and contrast of your picture. Stretch your picture histogram with the help of the auto contrast and levels settings. Use the curves tool to fine-tune your settings. When it comes to photo restoration, the curves tool is unnecessary in many cases. Obscurity may sometimes be helpful. Colour and contrast may be improved by following these procedures. More information is available in the following sections.
- Take a look at the picture in Photoshop.
Use the Curves Adjustment Layer to boost the image’s contrast if it’s too low. Sharpening tools may be used if the difference is too significant. Make it sharper by using a High Pass Filter or Unsharp Mask. Use the Curves adjustment layer if you still detect colour distortion. The picture should now be exported as a JPEG.
After making adjustments, use the ‘preview’ or ‘prescan’ feature.
Make sure you’re satisfied with the results by using the preview or prescan option to see what you’ve done. When you need to trim a picture or make other alterations, the preview feature comes in handy. When scanning, you may utilise the preview to get an idea of how the final product will appear. Once you’ve pressed the ‘prescan’ button, the scanner will do auto exposure, saving you even more time.
Reminisce!
You’ve come to the perfect location if you want to scan old photos. Contact the specialists at Memory Cherish if you have questions about photo restoration of your old photographs. Your memories are priceless, and we’re here to help you keep them in the best way possible. Retouching your photos is also possible.